Agent Mesh Connect (Android)
Preview
Agent Mesh Connect currently supports Android only. There is no iOS app. The app is tested in CI on an Android emulator. Its screens, the on-device tools it exposes and the FFI surface may change.Agent Mesh Connect is a Flutter app that runs agentmesh-node on an Android phone. The Go node is
compiled into a shared library and driven over Dart FFI. The app is the UI
around it, plus a small MCP server that exposes the phone’s sensors to the
mesh. A phone enrolled this way is a node like any other. It has a key, a
credential and a peer ID, and it appears in discovery with its
phone-sensors service.
Android tester tutorial
You need an Android 10 or newer phone and an internet connection. You can
join a public testnet through browser login, or join your own agentmesh-one
mesh by scanning its QR code. Choose one enrollment path, then follow the
same connection checks.
Keep Location off throughout this tutorial, and leave external MCP
bridging unconfigured. Other participants may be able to call services you
expose. The public testnets have no uptime commitment. A new agentmesh-one
mesh uses an open development policy that lets enrolled nodes call each
other’s services. Share enrollment codes only with people you intend to
admit.
1. Install the test build
- Open the Google Play testing invitation supplied by the test coordinator. Use the invited Google account, join the test, and install or update Agent Mesh Connect. If you were given an APK instead, download it from the supplied build link and open it on the phone. Android may ask you to allow installation from that source.
- Check that you have the build requested in the invitation. Record its version and build number, along with your phone model and Android version. The coordinator can identify the build number from the APK link if Android’s app information only shows the version name.
- Open Agent Mesh Connect. A new installation shows Welcome to Agent Mesh. If you already see the dashboard, the app has a saved enrollment. Keep it for an upgrade test, or use step 7 to change meshes.
Use the same installation source for updates. If Android rejects an APK update because its signature differs from the installed app, report it to the coordinator. Uninstalling or clearing app storage deletes the saved identity and settings.
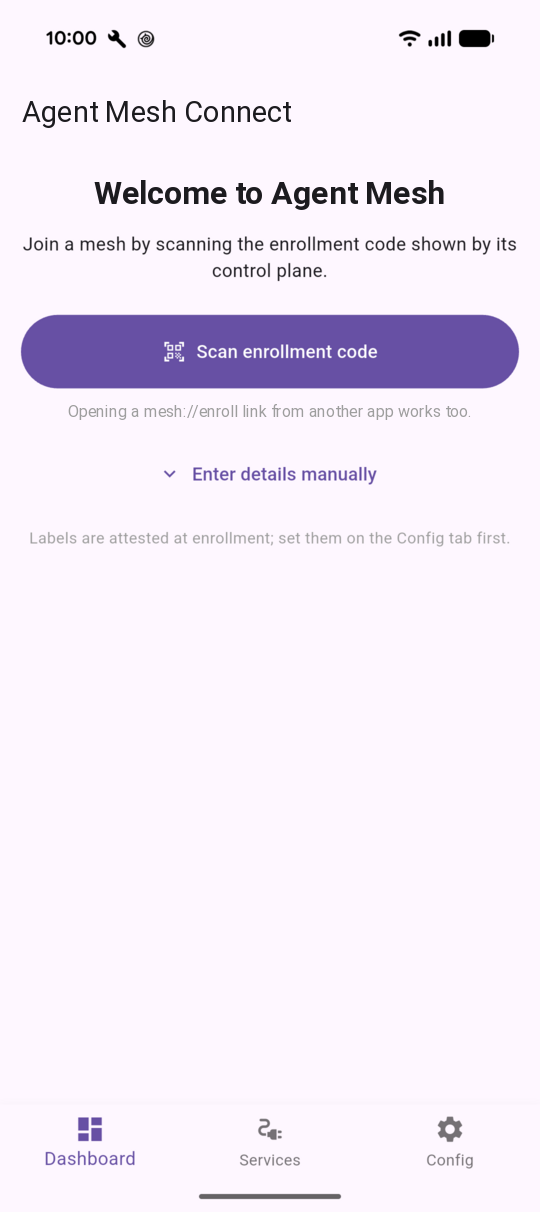
The welcome screen offers both paths: Enter details manually for a public testnet, or Scan enrollment code for your own mesh.
2. Choose your mesh
| Option | What you need | Enrollment path |
|---|---|---|
| Public testnet | A Google or GitHub account and a browser. You do not need to run a server. | Option A: Public testnet |
| Your own mesh | A computer running agentmesh-one, or a QR code from a trusted operator who runs it. No Google or GitHub login is needed for enrollment. | Option B: Your own mesh with a QR code |
For the public-testnet option, choose one of these URLs:
| Testnet | Control plane URL | When to use it |
|---|---|---|
| Bananas | https://bananas.sam-mesh.dev | Recommended for testing current development code. Its servers follow main. |
| Hub | https://hub.sam-mesh.dev | Compare against servers running the latest release. |
See Testnets for their access policy and
availability details. For your own mesh, use the HTTPS URL printed by
agentmesh-one, as described in option B.
Record the control plane URL you use. It is not an app download link. The dashboard currently shows Mesh: public-mesh for either enrollment path, so that label does not identify the server you joined.
3. Enroll
- On Services, check that Battery Status and Location are off.
- For a fresh test, leave Config unchanged. Labels and the Rules, Policies, and Checks fields should be empty. If this is an upgrade test with existing settings, record those settings before changing anything.
Then follow option A or option B.
Option A: Public testnet
- Return to Dashboard and tap Enter details manually.
- Enter your chosen testnet URL in Control plane URL, including
https://. - Leave Enrollment token empty. Public-testnet browser login does not require a token or QR code.
- Tap Login & Enroll (Browser). Complete the Google or GitHub sign-in
offered by
auth.sam-mesh.devin the browser on this phone. - When the browser shows Authorization successful!, return to Agent Mesh Connect using the app switcher. Keep the app open while enrollment finishes. The browser message only confirms the login callback.
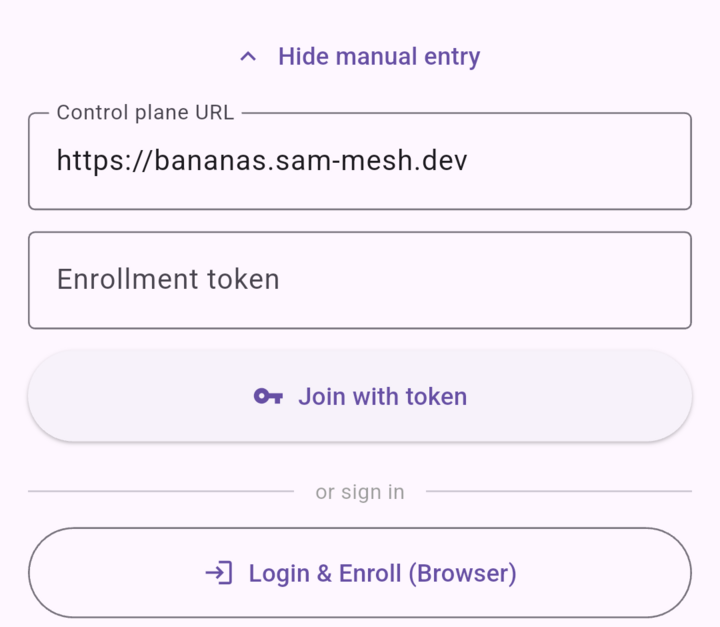
Public-testnet enrollment (cropped view). Enter your chosen testnet URL, leave Enrollment token empty, and use Login & Enroll (Browser).
If you need to sign in on another device, choose Device Login (TV / Other Device) instead. Open the displayed verification URL on that device, enter the code shown by the app, and complete sign-in. Keep Agent Mesh Connect open while it waits for approval. Treat the verification URL and code as private login information.
Once the dashboard appears, continue to step 4.
Option B: Your own mesh with a QR code
The Your own mesh guide
covers running agentmesh-one and reaching it from a phone. For this enrollment
test, you only need the server and its QR code. You can skip that guide’s
model-serving steps.
Use this command to start the mesh and print its enrollment QR code:
agentmesh-one --data-dir ~/agentmesh-one --tunnel cloudflare --enroll-qr
On your computer, install
agentmesh-oneusing the installation instructions. If a trusted operator already has a mesh running, ask them for an enrollment code and its expected hostname, then continue at item 4.Run the command above in a terminal on the computer.
If prompted, approve the download of
cloudflared. Wait for the HTTPS API URL and enrollment QR code in the terminal. The tunnel provides a temporarytrycloudflare.comaddress without requiring a Cloudflare account. Keepagentmesh-onerunning and the computer awake during the test.On the phone, return to Dashboard and tap Scan enrollment code. Allow camera access when asked and scan the code from the computer’s screen.
In Join this mesh?, check that Control plane matches the HTTPS hostname in the terminal or the one supplied by your operator. Tap Join only if it matches.
Keep the app open until the dashboard appears, then continue to step 4 of the tutorial. This enrollment path does not open Google or GitHub login.
The following output was captured from a temporary agentmesh-one instance.
Its QR token successfully enrolled a test node and was consumed. The server
and tunnel were then stopped and their state deleted. Token values and the
temporary directory path are redacted below. Use the URL and QR code from
your own terminal, not this example.
Agent Mesh standalone mesh is ready!

API URL:      https://used-encryption-assumptions-miller.trycloudflare.com
Tunnel:       https://used-encryption-assumptions-miller.trycloudflare.com -> http://127.0.0.1:46289
Web Console:  https://used-encryption-assumptions-miller.trycloudflare.com/console
Router Peer:  12D3KooWACEWomFbWyd7e2NWhyVakzZ81Kq97j7iiix1HuJzbTw1
Admin Token:  [redacted]
Join Token:   [redacted]

To enroll a node:
  agentmesh-node join https://used-encryption-assumptions-miller.trycloudflare.com --bootstrap-token-path <temporary-data-dir>/join-token
══════════════════════════════════════════════════════════════════

Scan with the Agent Mesh app to enroll a device into used-encryption-assumptions-miller.trycloudflare.com
(single use, valid for 1h0m0s):

█████████████████████████████████████████████████████████
█████████████████████████████████████████████████████████
████ ▄▄▄▄▄ ███▀█ █ ▄▄▄▄▀█▄▀  ▄▄▄ ▄▀▀ ▀▀▄▀ ▀▀ █ ▄▄▄▄▄ ████
████ █   █ █ ▄████▀█▀█▄█▄▀█▀▄▀█▀▄▄ ▀▄ ▀▀▀▀█ ▄█ █   █ ████
████ █▄▄▄█ █ ▀ █▄▄  ▄▄▀▄ ▄ ▄▄▄ ▀▄ ▄  █▀  ▄▀███ █▄▄▄█ ████
████▄▄▄▄▄▄▄█ █▄▀▄█▄█▄█ ▀ █ █▄█ ▀ ▀▄█ █▄▀▄▀ █ █▄▄▄▄▄▄▄████
████ ▀ ▄▄ ▄▀█ ▀▄▄▄▀▀▄  ▄▄▀ ▄▄▄▄▀█▀▀ ▀██ ▄ ▄▀▄█  ▄▄▄██████
████▄▄▄ ▀▀▄▀▄  █▀▄▀█▄▀█▄▀▀█ █▀ ▀▄ ▀  ▄ ▀▄▀ ▀▄ ██▀▄█  ████
█████▀▀▄█▀▄▀▄ █▀█▀▄█▄▀█▄█▀▄▀▄▀██▀▀ ▄█ ▄  ▄█▄▄ ▀▄▀▄▄▄█████
████ ▀██▄█▄▄▄  ▄▄ ██▄█ ▄█▀█ ▄█▄▄██▀▀▄█▄ ▄█ █ ██▀▀ ▄ ▄████
████ █ ▄ █▄▀   ▀█▄▄▄█▄▀▄▄▀█▄▄▄▄▄█▄ ▀█ ██ ▀█▄▄  ▄▀▀▄▀▄████
████▀ ▀▀ ▀▄▄▄ █ ▀▀ ▄▄▀▀▄█▄▄▄█▄▄▄▀  ▀██▄▄▄▀ ▀▀ ▀█▀███ ████
████  ▄  ▄▄█▄▀▀ ▀   ▀▄█▀▄ ██▄▄█▄▀▀  █▄▄ ▄▀█▄▄▄ ▀▀▄▄▄▄████
█████▀██ ▄▄▄  █▄█ ▀█▀█▀▀▀▀ ▄▄▄ ▀▀▄▀▄ ▄ ▀█▀ ▄ ▄▄▄ ██  ████
████▀███ █▄█ ▀▄▀██ ▄ ▄ ▀▄▄ █▄█ ██▄▀ ███ ▄█▄  █▄█ ▄▄▄▄████
████▄▀ █▄▄▄▄ ▄▀▀█▄▄ █▄█▄▄█    ▄▄ ▀▀█ █ █▄▀▄█▄▄▄  ▄▄█ ████
█████▄██ ▄▄▀█▀  ▄  █▄▀▄▀▀ ▀▄  █▄█   ███ ▄▀▄▄██ ▄▄ ▄ ▄████
████▀█▀██ ▄ █▄▄ ▀ █▀█▄█▀ █▄▄ ▀▀▀█ █▄▄█▄█▄▄▄▄▀▀▄█▀▄█  ████
████▀ ▀ ▄▀▄  ▄ ▀  ▄ ▀▄█▄▄█▄▄▀ █▀ ▀█▄ ▄▄▄  █▄▄   ▄▄ ▄▄████
███████ ▄█▄█▀██▄▀▀█▀▄▀██▄ ▄▄  ▀█ █ ▄ ▄▄█▄▀ ▄▀▄▄▄█▀█▄ ████
████▄▄█ █ ▄▄▄▄  ▄ ▄▀▄▄▀▀▄▀▄█▀██▄▀▀  ███ ▄██ ▀█  ▄█ ▀▄████
█████ ▀▀█▄▄▄▄▀ █▄█ ▀▀▄█▄▄█ █▀▄▀▀  ██▀▀▄ █  ▄  ▄▄▄▄▄ ▄████
████▄▄▄███▄█  ▄▀ ▀▄ █▀█ ▄  ▄▄▄ ██  ▄█▄█   █  ▄▄▄ ▄ ▄█████
████ ▄▄▄▄▄ █▀▄▄█▀ ▄▀  ▄ █▀ █▄█ ▀ ▀▀ ▀▀▄▀▄▀▄█ █▄█ ▄█  ████
████ █   █ █ ▄█▀███ ▄█▀▄█▀ ▄   ▄▀▀▀█▀█▄ ▄▀█▀  ▄▄ ▄▄▄ ████
████ █▄▄▄█ █▄▀██ █▄▄▄█ ▄█ ▀▄▄▀ ▄█▄ ██ ▄ █▀▄██▀▀█▀▀██▀████
████▄▄▄▄▄▄▄█▄▄▄█▄█▄███▄█▄███▄██▄█▄▄█████▄██▄████▄█▄▄▄████
█████████████████████████████████████████████████████████
▀▀▀▀▀▀▀▀▀▀▀▀▀▀▀▀▀▀▀▀▀▀▀▀▀▀▀▀▀▀▀▀▀▀▀▀▀▀▀▀▀▀▀▀▀▀▀▀▀▀▀▀▀▀▀▀▀

mesh://enroll?server=https%3A%2F%2Fused-encryption-assumptions-miller.trycloudflare.com&token=[redacted]
Token ID: 2542ac5fa60e (revoke early with: agentmesh-one token revoke 2542ac5fa60e)
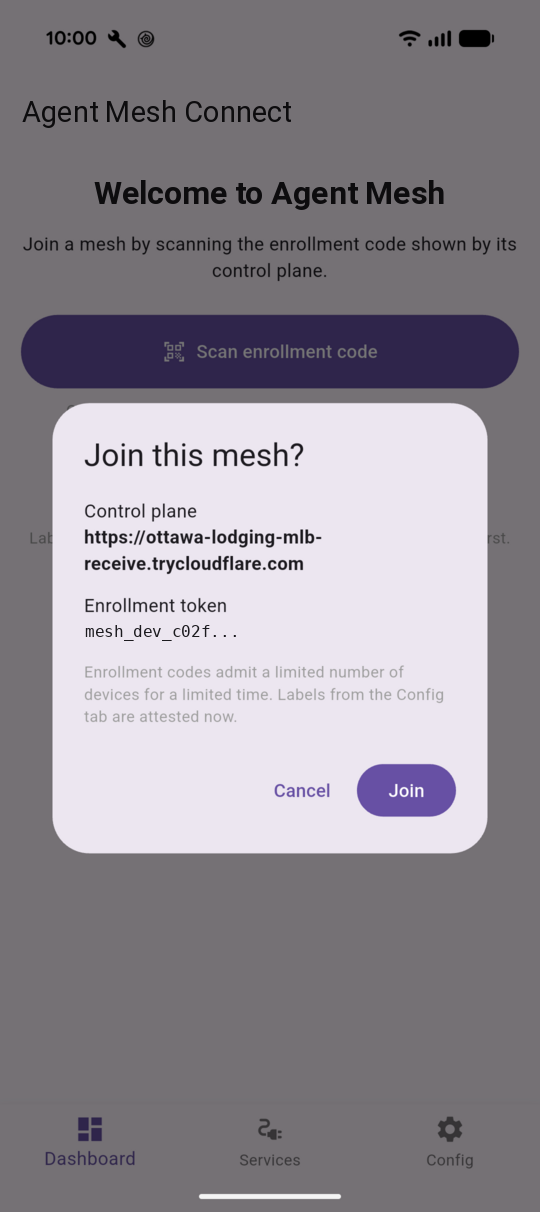
After scanning, check the control plane hostname before tapping Join. This screenshot shows an example tunnel address and the app’s shortened token hint; your values will differ.
The phone must be able to reach the HTTPS address. A computer’s
http://127.0.0.1 address refers to the phone itself when used on the phone,
and remote plaintext HTTP URLs are not accepted. An existing HTTPS reverse
proxy can be used instead of the temporary tunnel, as described in
Your own mesh.
The startup QR code admits one device by default. For another device, or when a code has expired or been used, keep the server running and generate a fresh code in another terminal. Replace the example hostname with the HTTPS API hostname from the server’s banner:
agentmesh-one token qr --data-dir ~/agentmesh-one \
  --server https://YOUR-HOSTNAME.trycloudflare.com
If scanning is unavailable, paste the complete mesh://enroll?... link
from the operator into Enrollment token under Enter details
manually. Check the populated Control plane URL, then tap Join
with token. The link contains a credential. Keep it and the QR code out
of screenshots and public reports. A temporary tunnel URL can change when
the server restarts, so use its current banner and record any restart
during testing.
Check enrollment
For either path, enrollment passes when the app switches to the dashboard with Start and Stop controls. The node may still show Node is Stopped until you start it. If the screen does not change after a minute, or shows an error, record the status text before retrying.
4. Start and check the connection
- Tap Start on Dashboard. If Android asks to allow notifications, allow them so you can see the background-service notification. Location permission is not needed. Camera access is only needed for QR scanning.
- Allow up to a minute for the connection to settle.
- Check that the dashboard says Node is Running, Node ID contains an identifier, and Connected Peers is greater than zero.
- Record the Node ID, Connected Peers, and DHT Size values. Peer counts can change. A particular DHT size is not a pass criterion.
Node is Running alone does not prove a mesh connection. Report a peer count that remains zero, even if the app shows no error.
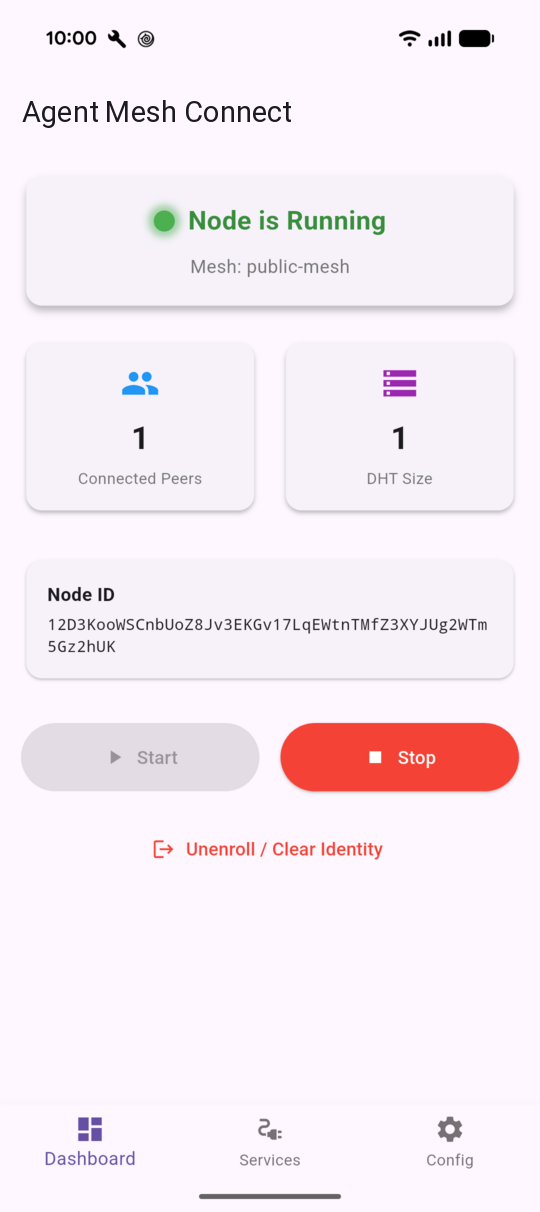
A connected node shows Node is Running, a Node ID, and at least one Connected Peer. Your Node ID and peer counts will differ from this example.
5. Check restart and reconnection
- Tap Stop. Confirm Node is Stopped, then tap Start again. Check that peers reconnect and Node ID is unchanged.
- With the node running, lock the phone for one minute. Unlock it and return to Agent Mesh Connect. Check the running state and peer count. Record any stop, crash, or failure to reconnect.
- If mobile data is available, switch from Wi-Fi to mobile data while the node is running, then switch back. Allow up to a minute after each change and record whether peers reconnect without a manual restart. Note whether a VPN or Private DNS is enabled, without changing those settings for the initial test. For your own mesh, keep the server and tunnel running. If its HTTPS address is only reachable on your local network, skip the mobile-data check and note that limitation.
- Tap Stop, close and reopen the app, then tap Start. Confirm it kept its enrollment and Node ID without asking you to sign in again.
If a check fails, capture the result before trying Stop and Start as a recovery step. Report whether that recovery worked. These checks should not require unenrollment or a device identity reset.
6. Optionally test battery sharing
This step shares your battery level and charging state with permitted mesh participants. Skip it if you only want to test enrollment and connectivity.
- While the node is running, open Services and enable Battery Status. Keep Location off.
- Give the test coordinator your Node ID and control plane URL. Ask them to
call
get_battery_statuson yourphone-sensorsservice from another node on the same mesh, as described below in Calling the phone from elsewhere. - Compare the returned battery level and charging state with the phone.
- Turn Battery Status off and ask for a new call. It should no longer return battery data. Record any permission denial or routing error separately from an incorrect sensor result.
The connection checks in steps 3-5 can pass without this remote tool test. A successful remote call also verifies that another node can reach the phone’s service.
7. Finish or switch meshes
- Turn off any service sharing you enabled and tap Stop when finished. You can keep the enrollment for the next test build.
- To test another mesh, record your current Node ID, then tap Unenroll / Clear Identity. In the confirmation dialog, choose Unenroll. This removes the enrollment credentials and keeps the device’s peer ID.
- Repeat steps 2-5 using the other mesh’s browser-login or QR path. Record the results for each mesh separately. For a QR enrollment, obtain a fresh code rather than reusing one that has already admitted a device.
Reset device identity also deletes the device key and local settings. Use it only when the coordinator explicitly asks for a fresh-identity test.
Troubleshooting and reports
| Symptom | What to check or report |
|---|---|
The testnet URL shows 404 in a browser | The root page is not a health check. Enter the URL in the app. Check the testnet health workflow for service incidents. |
| Login finishes but the app stays on enrollment | Return to the app on the same phone. Report the full status text and whether the browser showed the success message. |
| No enrollment QR appears | Check that agentmesh-one printed an HTTPS API URL and is running in an interactive terminal. You can generate a code with agentmesh-one token qr using that HTTPS URL. |
| A QR code or enrollment link is rejected | Confirm it is an Agent Mesh enrollment code from your operator and points to the expected HTTPS hostname. Request a fresh code if it expired or has already been used. |
| Your own mesh is unreachable | Check that the computer is awake and agentmesh-one and its tunnel are still running. Compare the recorded URL with the current banner. |
no good addresses or [::1]:53 | Report the app build and testnet. These were symptoms of the Android DNS bootstrap bug; confirm you installed the requested fixed build. |
| Enrollment is denied | Record the denial text and any configured labels. Do not paste a login token into the enrollment-token field. |
| Peers remain at zero or disappear after a network change | Report the network type, VPN/Private DNS state, and whether a manual stop/start recovers. |
| A tool call is denied | Record the tool name, mesh, and error. Access policy and the phone’s sharing settings can both deny a call. |
Send the following report to the test coordinator or the issue linked in your test invitation. For a failure, include a screenshot of the app’s status and the approximate time with time zone.
App version and build number:
Installation source or build link:
Phone model and Android version:
Mesh (Bananas, Hub, or your own agentmesh-one):
Control plane URL:
agentmesh-one version and tunnel/proxy type (if applicable):
Date, time, and time zone:
Wi-Fi or mobile data; VPN/Private DNS enabled:
Fresh enrollment or upgrade with saved identity:
Enrollment path (browser, device login, QR, or enrollment link):
Enrollment result:
Start result; Connected Peers; DHT Size:
Node ID (after starting):
Stop/start, screen lock, network switch, and reopen results:
Battery test result (or skipped):
Failed step, expected result, and exact error:
Recovery tried and result:
Remove API tokens, enrollment links or QR codes, verification codes, browser callback URLs, account details, and location data from screenshots and reports. You do not need to share the Local API Token for these tests.
Configuration
The Config tab holds what agentmesh-node.yaml holds on a desktop: labels
(comma-separated key=value) and the attenuation rules, policies and checks
(one Datalog statement per line, with the same syntax and the same errors as
the file). Labels are attested at enrollment, so changing them requires
pressing Re-enroll to apply. Browser-enrolled nodes can use the saved
login session to re-enroll while keeping their peer ID. Token-enrolled
nodes must unenroll and join again to change labels. The tab also shows the
API token that protects the node’s local API on the phone.
On Android 16 the app also registers two AppFunctions, getMeshStatus and
callRemoteMeshTool, so an on-device assistant can use the mesh without the
app in the foreground.
Calling the phone from elsewhere
From any enrolled node, the phone is a peer with an MCP service:
mcp-client -url "http://127.0.0.1:8080/mesh/<phone-peer-id>/mcp/phone-sensors" -token "$TOKEN" -list
mcp-client -url "http://127.0.0.1:8080/mesh/<phone-peer-id>/mcp/phone-sensors" -token "$TOKEN" -tool get_battery_status
{"battery_level": 64, "charging": true}
An agent finds the phone in the usual way. find_remote_tools lists
mcp://phone-sensors/get_location, describe_remote_tool shows that it
takes no arguments, and call_remote_tool returns
{"latitude": ..., "longitude": ...}. The policy on the control plane
decides who may call it. The phone’s own attenuation rules can narrow that
further.
How it is built
Flutter app (mobile/agentmesh-node-app)
  lib/main.dart            the UI; talks to the node's local API over 127.0.0.1
  lib/agentmesh_ffi.dart   Dart FFI wrapper
        │ C calls
Go FFI library (mobile/agentmesh-node-ffi)
  StartNode, StopNode, EnrollNode, EnrollNodeBootstrap, ReEnrollNode,
  UnenrollNode, IsEnrolled, GetNodeID, GetMeshInfo, CallRemoteTool, ...
        │
agentmesh-node (internal/node), unchanged
The FFI package is a thin export layer over the same node code that the CLI
uses, including CompleteNodeConfig for labels and attenuation, so both
agree on validation. Lifecycle operations go over FFI. Everything else the
UI does (listing peers, toggling services) goes over HTTP to the node’s
loopback API with a token generated at each launch.
Make targets:
| Target | Output |
|---|---|
make mobile-ffi-host | bin/libagentmesh.so for the build host, for desktop tests of the FFI. |
make mobile-ffi-android | bin/android/libagentmesh.so (arm64-v8a). |
make mobile-ffi-android-x86_64 | bin/android-x86_64/libagentmesh.so, for x86_64 emulators. Emulators on Apple Silicon run arm64 images and use the previous target. |
make mobile-app-apk | The FFI library copied into jniLibs/ and a release APK. mobile-app-apk-emulator and mobile-app-bundle are the emulator and Play Store variants. |
For an edit-run loop on a device:
make mobile-ffi-android
mkdir -p mobile/agentmesh-node-app/android/app/src/main/jniLibs/arm64-v8a
cp bin/android/libagentmesh.so mobile/agentmesh-node-app/android/app/src/main/jniLibs/arm64-v8a/
cd mobile/agentmesh-node-app && flutter run
Release builds read signing material from ANDROID_KEYSTORE_PATH,
ANDROID_KEYSTORE_PASSWORD, ANDROID_KEY_ALIAS and ANDROID_KEY_PASSWORD,
and Firebase configuration from GOOGLE_SERVICES_JSON or its base64 form.
mobile/agentmesh-node-app/README.md covers the toolchain setup.
Testing
mobile/mobile_e2e.sh runs the end-to-end check that CI uses. It starts a
mock identity provider, a control plane, a router and a host node with a
test tool. It then boots an Android emulator with the app, enrolls it,
registers a tool inside the emulator, and checks that each side discovers
the other’s tool through the mesh.
The app’s privacy policy, for the store listing, is at /docs/privacy/.