Rendering Difference Test
This tool (/test/renderdiff) is a collection of scripts to run visual regression tests on both gltf_viewer models and standalone Filament sample applications, producing headless renderings for automated diff comparison against golden references.
This is mainly useful for continuous integration where GPUs are generally not available on cloud machines. To perform software rasterization, these scripts are centered around Mesa's software rasterizers, but nothing bars us from using another rasterizer like SwiftShader. Additionally, we should be able to use GPUs where available (though this is more of a future work).
The script render.py contains the core logic for taking input parameters (such as the test
description file) and executing the corresponding tests.
In the test directory is a list of test descriptions that are specified in JSON. Please see
test/renderdiff/FORMAT.md and test/renderdiff/tests/sample.json
to glean the structure, and arch.md for the end-to-end framework architecture.
These tests support both gltf_test (glTF models) and sample_test
(standalone sample binaries), declaring which renderers they run on using the platform-backend
specification format (e.g., "desktop-opengl", "desktop-vulkan", "web-webgl").
Platforms
There are two platforms, and they keep separate goldens. The same scene rendered
natively and in a browser does not produce the same pixels -- different rasterizer,
different shader compiler -- so a web-webgl golden is never compared against a
desktop-opengl one.
| Platform | How it renders | Backends |
|---|---|---|
desktop | Runs the native gltf_viewer headlessly against Mesa's software rasterizers. | opengl, vulkan, webgpu |
web | Builds gltf_viewer to WebAssembly and drives it in a headless Chromium on SwiftShader. | webgl, webgpu |
The web platform is reproducible only because three things are pinned: the browser build
(via playwright in rendering_requirements.txt, asserted at runtime against
EXPECTED_BROWSER_VERSION in web_renderer.py), the rasterizer (SwiftShader, asserted at
startup), and the render size. Changing any of them means regenerating the web goldens.
Setting up python
The renderdiff project uses python extensively. To install the dependencies for producing
renderings, do the following step
- Set up a virtual environment (from the root directory)
python3 -m venv venv . ./venv/bin/activate - Install the rendering dependencies
pip install -r test/renderdiff/src/rendering_requirements.txt - Install the viewer depdencies
pip install -r test/renderdiff/src/viewer_requirements.txt - For the commands in the following section, do not exit the virtual environment. Once you've
completed all your work, you can exit with
deactivate
Running the test locally
- To run the same presbumit as
test-renderdiff, you can dobash test/renderdiff/local_test.sh - This script will generate the renderings based on the current state of your repo. Additionally, it will also compare the generated images with corresponding images in the golden repo.
- To just render without running the test, you could use the following script
bash test/renderdiff/generate.sh - Both scripts default to
--platform=desktop. To render the web platform instead:
This needs an emscripten SDK onbash test/renderdiff/generate.sh --platform=web$EMSDK(bash build/common/get-emscripten.sh); the script installs the pinned browser itself. Only one platform is rendered per invocation, matching how CI splits them across runners.
[!IMPORTANT] The goldens are rendered on Linux/aarch64. A golden's path records the platform and the backend (
desktop-opengland so on) but not the host, and different hosts produce different pixels for reasons unrelated to any change: a different compiler, a different Mesa build, a different libm. On any other host, including macOS,local_test.shprints a warning and its comparison results are advisory. Rendering locally is still the fastest way to see what a change does; to judge it against the goldens, read the presubmit result.
Command-line Options
--test=<path>: Path to the test suite configuration JSON file (defaults totest/renderdiff/tests/presubmit.json). For example,--test=test/renderdiff/tests/sample.json.--platform=<desktop|web>: Which platform to build and render for (defaults todesktop). Passed tocompare.pyas well, which scopes the comparison to that platform's goldens.--test_filter=<filter>: Run a subset of tests using fnmatch wildcards (*). It filters against the pattern{test.name}.{platform}-{backend}.{target}.--no_rebuild: Skip rebuilding the executables (gltf_viewerandfilament-samples).--build-only: Build the executables and stop, without rendering. Used by the CI job that warms the compiler cache.--num_threads=<number>: Number of renders to run concurrently. Each render uses the whole machine, because the software drivers size their worker pools from the core count, so the default is a quarter of the cores clamped to the range 2 to 4. Raising it oversubscribes the machine. Ignored onweb, which renders sequentially (one browser page per test).
For example, to run all MSAA tests on Vulkan without rebuilding, two renders at a time:
bash test/renderdiff/local_test.sh --test_filter='MSAA.*vulkan*.*' --no_rebuild --num_threads=2
When a render crashes
A render that dies on a signal is reported as, for example, error=-6 (killed by SIGABRT), and its
output usually names only the assertion that fired, which says nothing about the call that provoked
it.
Every run therefore collects what the crash left behind, at no cost when nothing crashed.
generate.sh raises the core limit before rendering and runs src/report_crashes.sh on the way
out, which writes a symbolized backtrace per crash into out/renderdiff/crashes. The CI uploads
that directory with the rest of the renderdiff output, and the backtraces are echoed into the job
log as well.
The two platforms leave different evidence, and the script handles both:
- On Linux the kernel writes a core, read by
gdb. Where it goes iskernel.core_pattern, which only root can change, so the CI points it at/tmp/renderdiff-cores; a local run without that setting usually leaves acorefile in the test's working directory under/tmp/renderdiff, which the script also searches. Cores are deleted once read, because a debug build produces a very large one; setRENDERDIFF_KEEP_CORES=1to keep them. - On macOS no core is written, regardless of the core limit, but ReportCrash leaves a symbolicated
.ipsreport in~/Library/Logs/DiagnosticReports. The script renders those as ordinary backtraces withsrc/format_ips.py.
The web platform never leaves a core, because a crash happens inside the browser. Instead, every
web render writes the whole browser console next to its image, as
out/renderdiff/renders/<suite>/<name>.console.log. The file is written whether or not the render
succeeded, and the CI uploads it with the rest of the output. A failed render also prints the last
30 console lines into the job log.
Update the golden images
The golden images are stored in a github repository:
https://github.com/google/filament-assets. Filament team members should have access to write
to the repository. A typical flow for updating the goldens is to upload your changed images
into branch of filament-assets. This branch is paired with a PR or commit on the
filament repo.
Because the goldens have to come from the same host presubmit renders on, the images themselves have to be produced by CI rather than on your machine. The routes below are ordered by how much you have to do by hand; the last two are only correct if you are running them on Linux/aarch64.
Automated update via commit message
If you are confident in your changes and want CI to handle the update for you, add the following
line to the commit message of your working branch on filament:
RDIFF_ACCEPT_NEW_GOLDENS
This has the following effects:
- The presubmit test
test-renderdiffwill be bypassed (it will not perform rendering or comparison). - When the PR is merged, the postsubmit CI will automatically:
- Build Filament and generate the new images, on the same runner presubmit compares on.
- Upload them to a temporary branch in
filament-assets. - Merge that branch into
main.
The cost of this route is that nothing verifies the new goldens before they land: presubmit does not compare, so the first evidence that they are right is the next PR passing.
Using the 'Renderdiff Goldens' workflow
To see the new goldens applied in presubmit before the change lands, generate them first:
- Run the Renderdiff Goldens workflow from the Actions tab, selecting your
filamentbranch and giving it a branch name for the golden repo (for examplemy-pr-branch-golden). The workflow renders on the presubmit runner and pushes the images to that branch, overwriting it if it already exists. - Add the following line to the commit message of your working branch on
filament:RDIFF_BRANCH=my-pr-branch-golden
Doing the above has multiple effects:
- The presubmit test
test-renderdiffwill test against the provided branch of the golden repo (i.e.my-pr-branch-golden), so you can confirm the change is green before it merges. - If the PR is merged, then there is another workflow that will merge
my-pr-branch-goldento themainbranch of the golden repo.
From the images a presubmit run produced
Every test-renderdiff run attaches its renders as the presubmit-renderdiff-result artifact,
including runs whose comparison failed, which is exactly when the images are interesting. Each
platform leg (test-renderdiff-platform) uploads its own output, and the test-renderdiff job
combines them into that one artifact.
This is the route to use when the Renderdiff Goldens workflow is not available, for instance
when the workflow file itself is only present on your branch.
- Download and unpack
presubmit-renderdiff-resultfrom the run. - Build
diffimglocally, which the script uses to work out which images actually changed:./build.sh debug diffimg - Push the images to a branch of the golden repo. This needs write access to
filament-assets, over SSH by default:python3 test/renderdiff/src/update_golden.py \ --branch=my-pr-branch-golden \ --source=<unpacked artifact>/renders \ --commit-msg="New goldens for my change" \ --push-to-remote - Add
RDIFF_BRANCH=my-pr-branch-goldento the commit message, as above.
Manually updating the golden repo
- Check out the golden repo
git clone git@github.com:google/filament-assets.git - Create a branch on the golden repo
cd filament-assets git switch -c my-pr-branch-golden - Copy the new images to their appropriate place in
filament-assets - Push the
filament-assetsworking branch to remotegit push origin my-pr-branch-golden - In the commit message of your working branch on
filament, add the following lineRDIFF_BRANCH=my-pr-branch-golden
Using a script to update the golden repo
For the interactive equivalent of the above, which walks you through generating, reviewing and pushing the changes:
- Make sure you've completed the steps in 'Setting up python'
- Run interactive mode in the
update_golden.pyscript.python3 test/renderdiff/src/update_golden.py - Note the host caveat above: images generated this way are only the right goldens if you are on Linux/aarch64.
Viewing test results
We provide a viewer for looking at the result of a test run. The viewer is a webapp that can be used by pointing your browser to a localhost port. If you input the viewer with a PR or a directory, it will parse the test result and show the results and the rendered and/or golden images.
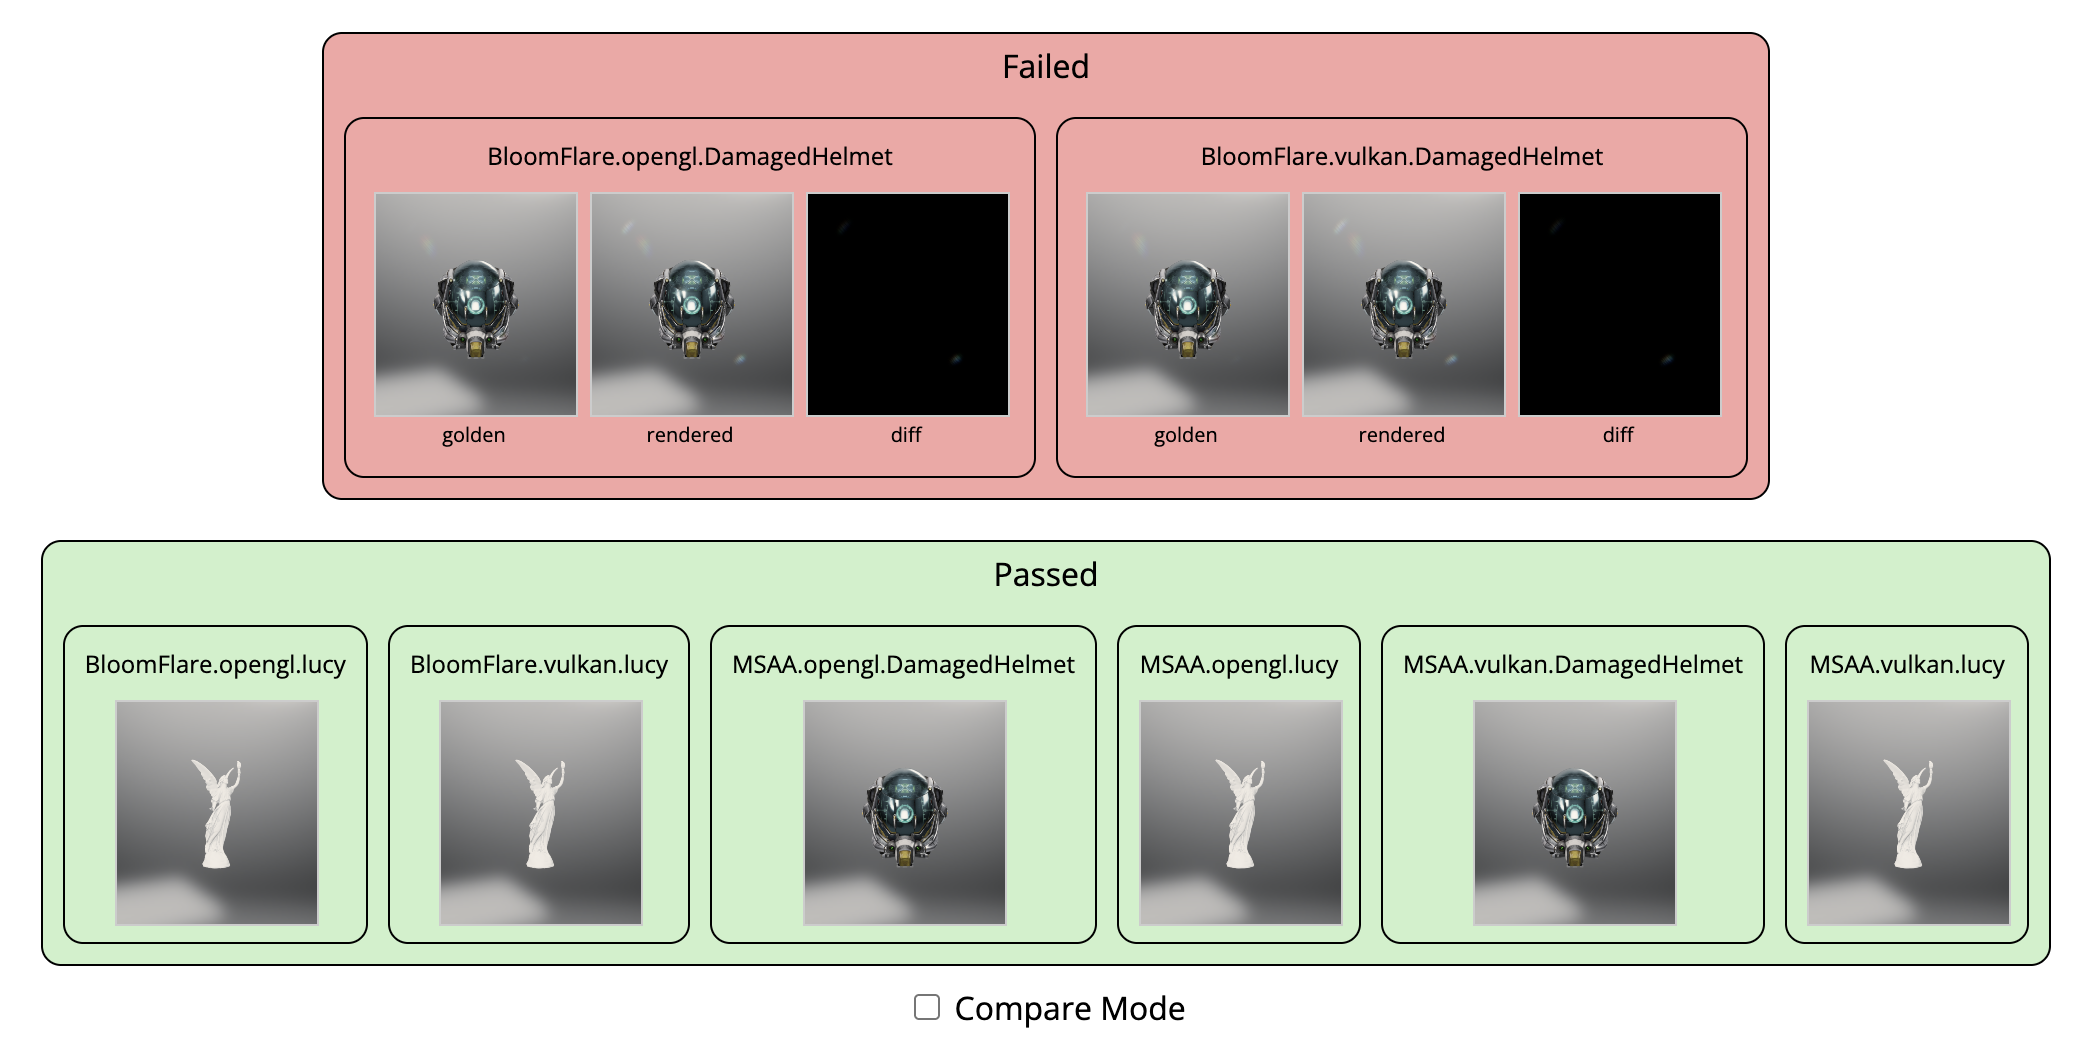
To run the viewer of a test output directory that has been generated locally, you would run the following
python3 test/renderdiff/src/viewer.py --diff=[test output]
where [test output] is a directory containing the compare_results*.json of the test run.
For example, it could be out/renderdiff/diffs/presubmit for the standard path to the
presubmit test output. A platform-scoped run writes one file per platform
(compare_results_desktop.json, compare_results_web.json); the viewer merges whatever it
finds, and when a CI run is downloaded it overlays every platform's artifact into one tree
first.
To see the results of a Pull Request initiated test run, you would do the following
python3 test/renderdiff/src/viewer.py --pr_number=[PR #] --github_token=[github token]
where [PR #] is the numeric ID of your pull request, and the [github token] is an acess
token that you (as a github user) needs to generate (reference).
To see the results of a specific run, you would do the following
python3 test/renderdiff/src/viewer.py --run_number=[RUN #] --github_token=[github token]
where [RUN #] is the numeric ID of the run. You can find the run number in the URL of the
GitHub Actions page. For example, in the URL
https://github.com/google/filament/actions/runs/18023632663/job/51286323708?pr=9264,
the run number is 18023632663.