Guided Remediation
Experimental
Table of contents
Guided remediation (osv-scanner fix) aims to help developers with fixing the high number of known vulnerabilities in dependencies typically reported by vulnerability scanners by providing a small number of actionable steps.
This tool provides several options to users for how to prioritise and remediate their vulnerabilities, with easy to understand information on how we arrived at these options and how to compare them. This includes features such as:
- Resolution and analysis of the entire transitive graph (leveraging deps.dev) to determine the minimal changes required to remove vulnerabilities.
- Prioritising direct dependency upgrades by the total number of transitive vulnerabilities fixed.
- Prioritising vulnerabilities by dependency depth, severity, and whether to care about dev-only dependencies.
- Modification of package manifest and lockfiles (e.g.
package.json/package-lock.json) to fix vulnerabilities. - Different strategies with different risk/reward ratios (e.g. in-place fixes vs relocking).
This feature is experimental and might change or be removed with only a minor version update.
Supported strategies
We currently support remediating vulnerabilities in the following files:
| Ecosystem | File Format (Type) | Supported Remediation Strategies |
|---|---|---|
| npm | package-lock.json (lockfile) | in-place |
| npm | package.json (manifest) | relock |
| Maven | pom.xml (manifest)note | override |
By default, the tool only checks dependencies that are actually present in a POM’s dependency graph - it will not detect vulnerabilities in <dependencyManagement> dependencies if they are not actually used when resolving the POM. The --maven-fix-management flag can be used to also fix them.
Basic usage
To fix as many vulnerabilities as possible in your package-lock.json file in-place, you can use the following command:
osv-scanner fix --strategy=in-place -L path/to/package-lock.json
Alternatively, to potentially resolve even more vulnerabilities with larger (potentially breaking) changes, you can regenerate your lockfile and update your direct dependencies with the following command:
osv-scanner fix --strategy=relax -M path/to/package.json -L path/to/package-lock.json
For Maven pom.xml files, you can update direct dependencies and add version overrides to your POM’s <dependencyManagement> section with the following command:
osv-scanner fix --strategy=override -M path/to/pom.xml
The subcommand will modify your manifest and lockfile. Make sure you commit or backup your files before running.
The subcommand will not reinstall your node_modules/ - you will need to manually run npm ci to install dependencies.
If you wish to remediation only specific vulnerabilities, you may specify OSV IDs using the --vulns flag. See all remediation flags.
Output formats
Non-interactive mode outputs to the terminal the actions taken and vulnerabilities remediated. The output format can be controlled with the --format flag.
The output formats may change with minor version updates.
Text (default)
The default format.
osv-scanner fix --format text --strategy=in-place -L path/to/package-lock.json
Sample in-place text output
Scanning path/to/package-lock.json...
Found 55 vulnerabilities matching the filter
Can fix 25/55 matching vulnerabilities by changing 21 dependencies
UPGRADED-PACKAGE: lodash,4.17.20,4.17.21
UPGRADED-PACKAGE: minimist,1.2.0,1.2.8
UPGRADED-PACKAGE: ws,6.2.1,6.2.3
UPGRADED-PACKAGE: ws,7.1.2,7.5.10
UPGRADED-PACKAGE: acorn,5.7.3,5.4.1
UPGRADED-PACKAGE: acorn,6.0.2,6.4.2
UPGRADED-PACKAGE: acorn,7.1.0,7.4.1
UPGRADED-PACKAGE: ansi-regex,3.0.0,3.0.1
UPGRADED-PACKAGE: dat.gui,0.7.3,0.7.9
UPGRADED-PACKAGE: get-func-name,2.0.0,2.0.2
UPGRADED-PACKAGE: glob-parent,5.0.0,5.1.2
UPGRADED-PACKAGE: json5,2.1.0,2.2.3
UPGRADED-PACKAGE: minimist,1.2.5,1.2.8
UPGRADED-PACKAGE: node-fetch,2.6.6,2.7.0
UPGRADED-PACKAGE: path-parse,1.0.6,1.0.7
UPGRADED-PACKAGE: pathval,1.1.0,1.1.1
UPGRADED-PACKAGE: qs,6.5.2,6.5.3
UPGRADED-PACKAGE: semver,5.5.1,5.7.2
UPGRADED-PACKAGE: semver,5.6.0,5.7.2
UPGRADED-PACKAGE: semver,6.3.0,6.3.1
UPGRADED-PACKAGE: y18n,4.0.0,4.0.3
FIXED-VULN-IDS: GHSA-29mw-wpgm-hmr9,GHSA-35jh-r3h4-6jhm,GHSA-3h5v-q93c-6h6q,GHSA-3h5v-q93c-6h6q,GHSA-4q6p-r6v2-jvc5,GHSA-6chw-6frg-f759,GHSA-6chw-6frg-f759,GHSA-6chw-6frg-f759,GHSA-6fc8-4gx4-v693,GHSA-6fc8-4gx4-v693,GHSA-93q8-gq69-wqmw,GHSA-9c47-m6qq-7p4h,GHSA-c2qf-rxjj-qqgw,GHSA-c2qf-rxjj-qqgw,GHSA-c2qf-rxjj-qqgw,GHSA-c4w7-xm78-47vh,GHSA-chwr-hf3w-c984,GHSA-g6ww-v8xp-vmwg,GHSA-hj48-42vr-x3v9,GHSA-hrpp-h998-j3pp,GHSA-r683-j2x4-v87g,GHSA-vh95-rmgr-6w4m,GHSA-ww39-953v-wcq6,GHSA-xvch-5gv4-984h,GHSA-xvch-5gv4-984h
REMAINING-VULNS: 30
UNFIXABLE-VULNS: 30
Rewriting path/to/package-lock.json...
osv-scanner fix --format text --strategy=relax -M path/to/package.json -L path/to/package-lock.json
Sample relax text output
Resolving path/to/package.json...
Found 12 vulnerabilities matching the filter
Can fix 9/12 matching vulnerabilities by changing 6 dependencies
UPGRADED-PACKAGE: mocha,^5.2.0,^9.2.2
UPGRADED-PACKAGE: @google-cloud/cloudbuild,^2.6.0,^4.5.0
UPGRADED-PACKAGE: autoprefixer,^9.3.0,^10.4.20
UPGRADED-PACKAGE: google-closure-library,^20190909.0.0,^20200315.0.0
UPGRADED-PACKAGE: terser,^3.10.11,^4.8.1
UPGRADED-PACKAGE: yargs,^12.0.2,^13.3.2
FIXED-VULN-IDS: GHSA-4wf5-vphf-c2xc,GHSA-7fh5-64p2-3v2j,GHSA-7v5v-9h63-cj86,GHSA-f8q6-p94x-37v3,GHSA-h755-8qp9-cq85,GHSA-p9pc-299p-vxgp,GHSA-vh5w-fg69-rc8m,GHSA-vh95-rmgr-6w4m,GHSA-xvch-5gv4-984h
REMAINING-VULNS: 3
UNFIXABLE-VULNS: 3
Rewriting path/to/package.json...
Shelling out to regenerate lockfile...
Executing `/usr/bin/npm install --package-lock-only`...
osv-scanner fix --format text --strategy=override -M path/to/pom.xml
Sample override output
Resolving path/to/pom.xml...
Found 60 vulnerabilities matching the filter
Can fix 44/60 matching vulnerabilities by overriding 24 dependencies
OVERRIDE-PACKAGE: io.atomix:atomix,3.1.6
OVERRIDE-PACKAGE: org.apache.pdfbox:pdfbox,2.0.24
OVERRIDE-PACKAGE: xerces:xercesImpl,2.12.2
OVERRIDE-PACKAGE: com.google.guava:guava,32.0.0-jre
OVERRIDE-PACKAGE: org.apache.mina:mina-core,2.0.27
OVERRIDE-PACKAGE: com.fasterxml.jackson.core:jackson-databind,2.12.7.1
OVERRIDE-PACKAGE: io.netty:netty-handler,4.1.94.Final
OVERRIDE-PACKAGE: org.apache.commons:commons-compress,1.26.0
OVERRIDE-PACKAGE: org.apache.commons:commons-configuration2,2.10.1
OVERRIDE-PACKAGE: org.apache.shiro:shiro-web,1.13.0
OVERRIDE-PACKAGE: org.eclipse.jgit:org.eclipse.jgit,5.13.3.202401111512-r
OVERRIDE-PACKAGE: com.nimbusds:nimbus-jose-jwt,9.37.2
OVERRIDE-PACKAGE: commons-io:commons-io,2.14.0
OVERRIDE-PACKAGE: io.netty:netty,3.9.8.Final
OVERRIDE-PACKAGE: io.netty:netty-common,4.1.115.Final
OVERRIDE-PACKAGE: org.apache.directory.api:api-ldap-model,1.0.0-M31
OVERRIDE-PACKAGE: org.apache.shiro:shiro-core,1.13.0
OVERRIDE-PACKAGE: org.eclipse.jetty:jetty-http,12.0.12
OVERRIDE-PACKAGE: org.eclipse.jetty:jetty-server,9.4.56.v20240826
OVERRIDE-PACKAGE: org.glassfish.jersey.core:jersey-common,2.34
OVERRIDE-PACKAGE: xalan:xalan,2.7.3
OVERRIDE-PACKAGE: org.apache.thrift:libthrift,0.14.0
OVERRIDE-PACKAGE: org.apache.tomcat.embed:tomcat-embed-core,8.5.99
OVERRIDE-PACKAGE: io.netty:netty-codec,4.1.68.Final
FIXED-VULN-IDS: GHSA-2fqw-684c-pvp7,GHSA-2h3j-m7gr-25xj,GHSA-3p86-9955-h393,GHSA-4265-ccf5-phj5,GHSA-4g9r-vxhx-9pgx,GHSA-4jhc-wjr3-pwh2,GHSA-5h29-qq92-wj7f,GHSA-5mg8-w23w-74h3,GHSA-6mcm-j9cj-3vc3,GHSA-6mjq-h674-j845,GHSA-6vqp-h455-42mr,GHSA-6vvh-5794-vpmj,GHSA-76h9-2vwh-w278,GHSA-78wr-2p64-hpwj,GHSA-7fr2-94h7-ccg2,GHSA-7g45-4rm6-3mm3,GHSA-7grw-6pjh-jpc9,GHSA-7j4h-8wpf-rqfh,GHSA-9339-86wc-4qgf,GHSA-9w38-p64v-xpmv,GHSA-c43q-5hpj-4crv,GHSA-cx3q-cv6w-mx4h,GHSA-fg3j-q579-v8x4,GHSA-g2fg-mr77-6vrm,GHSA-g7p8-r2ch-4rmf,GHSA-g8m5-722r-8whq,GHSA-gvpg-vgmx-xg6w,GHSA-h65f-jvqw-m9fj,GHSA-hhw5-c326-822h,GHSA-jc7h-c423-mpjc,GHSA-jjjh-jjxp-wpff,GHSA-m4h3-7mc2-v295,GHSA-mf27-wg66-m8f5,GHSA-mm9x-g8pc-w292,GHSA-mvr2-9pj6-7w5j,GHSA-pmhc-2g4f-85cg,GHSA-q446-82vq-w674,GHSA-qh8g-58pp-2wxh,GHSA-rgv9-q543-rqg4,GHSA-vmqm-g3vh-847m,GHSA-w4jq-qh47-hvjq,GHSA-xfv3-rrfm-f2rv,GHSA-xjp4-hw94-mvp5,GHSA-xq3w-v528-46rv
REMAINING-VULNS: 16
UNFIXABLE-VULNS: 15
Rewriting path/to/pom.xml...
JSON
Outputs the results as a JSON object to stdout, with all other output being directed to stderr - this makes it safe to redirect the output to a file.
The json format is expected to be stable. It is intended to be suitable for integration with automated tooling.
osv-scanner fix --format json --strategy=relax -M path/to/package.json
Sample relax JSON output
{
  "path": "path/to/package.json",
  "ecosystem": "npm",
  "strategy": "relax",
  "vulnerabilities": [
    {
      "id": "GHSA-gcx4-mw62-g8wm",
      "packages": [
        {
          "name": "rollup",
          "version": "1.32.1"
        }
      ],
      "unactionable": true
    },
    {
      "id": "GHSA-h755-8qp9-cq85",
      "packages": [
        {
          "name": "protobufjs",
          "version": "6.11.3"
        }
      ]
    },
    {
      "id": "GHSA-pfq8-rq6v-vf5m",
      "packages": [
        {
          "name": "html-minifier",
          "version": "4.0.0"
        }
      ],
      "unactionable": true
    },
    {
      "id": "GHSA-xvch-5gv4-984h",
      "packages": [
        {
          "name": "minimist",
          "version": "0.0.8"
        }
      ]
    }
  ],
  "patches": [
    {
      "packageUpdates": [
        {
          "name": "@google-cloud/cloudbuild",
          "versionFrom": "^2.6.0",
          "versionTo": "^4.7.0",
          "transitive": false
        }
      ],
      "fixed": [
        {
          "id": "GHSA-h755-8qp9-cq85",
          "packages": [
            {
              "name": "protobufjs",
              "version": "6.11.3"
            }
          ]
        }
      ]
    },
    {
      "packageUpdates": [
        {
          "name": "mocha",
          "versionFrom": "^5.2.0",
          "versionTo": "^8.4.0",
          "transitive": false
        }
      ],
      "fixed": [
        {
          "id": "GHSA-xvch-5gv4-984h",
          "packages": [
            {
              "name": "minimist",
              "version": "0.0.8"
            }
          ]
        }
      ]
    }
  ]
}
osv-scanner fix --format json --strategy=override -M path/to/pom.xml
Sample override JSON output
{
  "path": "path/to/pom.xml",
  "ecosystem": "Maven",
  "strategy": "override",
  "vulnerabilities": [
    {
      "id": "GHSA-3832-9276-x7gf",
      "packages": [
        {
          "name": "commons-httpclient:commons-httpclient",
          "version": "3.0.1"
        }
      ],
      "unactionable": true
    },
    {
      "id": "GHSA-56h3-78gp-v83r",
      "packages": [
        {
          "name": "org.codehaus.jettison:jettison",
          "version": "1.1"
        }
      ]
    },
    {
      "id": "GHSA-6hgm-866r-3cjv",
      "packages": [
        {
          "name": "commons-collections:commons-collections",
          "version": "3.2.1"
        }
      ]
    },
    {
      "id": "GHSA-6phf-73q6-gh87",
      "packages": [
        {
          "name": "commons-beanutils:commons-beanutils",
          "version": "1.7.0"
        }
      ]
    },
    {
      "id": "GHSA-78wr-2p64-hpwj",
      "packages": [
        {
          "name": "commons-io:commons-io",
          "version": "2.1"
        }
      ]
    },
    {
      "id": "GHSA-7rf3-mqpx-h7xg",
      "packages": [
        {
          "name": "org.codehaus.jettison:jettison",
          "version": "1.1"
        }
      ]
    },
    {
      "id": "GHSA-c27h-mcmw-48hv",
      "packages": [
        {
          "name": "org.codehaus.jackson:jackson-mapper-asl",
          "version": "1.8.8"
        }
      ],
      "unactionable": true
    },
    {
      "id": "GHSA-cgp8-4m63-fhh5",
      "packages": [
        {
          "name": "commons-net:commons-net",
          "version": "1.4.1"
        }
      ]
    },
    {
      "id": "GHSA-fjq5-5j5f-mvxh",
      "packages": [
        {
          "name": "commons-collections:commons-collections",
          "version": "3.2.1"
        }
      ]
    },
    {
      "id": "GHSA-grr4-wv38-f68w",
      "packages": [
        {
          "name": "org.codehaus.jettison:jettison",
          "version": "1.1"
        }
      ]
    },
    {
      "id": "GHSA-gwrp-pvrq-jmwv",
      "packages": [
        {
          "name": "commons-io:commons-io",
          "version": "2.1"
        }
      ]
    },
    {
      "id": "GHSA-q6g2-g7f3-rr83",
      "packages": [
        {
          "name": "org.codehaus.jettison:jettison",
          "version": "1.1"
        }
      ]
    },
    {
      "id": "GHSA-r6j9-8759-g62w",
      "packages": [
        {
          "name": "org.codehaus.jackson:jackson-mapper-asl",
          "version": "1.8.8"
        }
      ],
      "unactionable": true
    },
    {
      "id": "GHSA-x27m-9w8j-5vcw",
      "packages": [
        {
          "name": "org.codehaus.jettison:jettison",
          "version": "1.1"
        }
      ]
    }
  ],
  "patches": [
    {
      "packageUpdates": [
        {
          "name": "org.codehaus.jettison:jettison",
          "versionFrom": "1.1",
          "versionTo": "1.5.4",
          "transitive": true
        }
      ],
      "fixed": [
        {
          "id": "GHSA-56h3-78gp-v83r",
          "packages": [
            {
              "name": "org.codehaus.jettison:jettison",
              "version": "1.1"
            }
          ]
        },
        {
          "id": "GHSA-7rf3-mqpx-h7xg",
          "packages": [
            {
              "name": "org.codehaus.jettison:jettison",
              "version": "1.1"
            }
          ]
        },
        {
          "id": "GHSA-grr4-wv38-f68w",
          "packages": [
            {
              "name": "org.codehaus.jettison:jettison",
              "version": "1.1"
            }
          ]
        },
        {
          "id": "GHSA-q6g2-g7f3-rr83",
          "packages": [
            {
              "name": "org.codehaus.jettison:jettison",
              "version": "1.1"
            }
          ]
        },
        {
          "id": "GHSA-x27m-9w8j-5vcw",
          "packages": [
            {
              "name": "org.codehaus.jettison:jettison",
              "version": "1.1"
            }
          ]
        }
      ]
    },
    {
      "packageUpdates": [
        {
          "name": "commons-collections:commons-collections",
          "versionFrom": "3.2.1",
          "versionTo": "3.2.2",
          "transitive": true
        }
      ],
      "fixed": [
        {
          "id": "GHSA-6hgm-866r-3cjv",
          "packages": [
            {
              "name": "commons-collections:commons-collections",
              "version": "3.2.1"
            }
          ]
        },
        {
          "id": "GHSA-fjq5-5j5f-mvxh",
          "packages": [
            {
              "name": "commons-collections:commons-collections",
              "version": "3.2.1"
            }
          ]
        }
      ]
    },
    {
      "packageUpdates": [
        {
          "name": "commons-io:commons-io",
          "versionFrom": "2.1",
          "versionTo": "2.14.0",
          "transitive": false
        }
      ],
      "fixed": [
        {
          "id": "GHSA-78wr-2p64-hpwj",
          "packages": [
            {
              "name": "commons-io:commons-io",
              "version": "2.1"
            }
          ]
        },
        {
          "id": "GHSA-gwrp-pvrq-jmwv",
          "packages": [
            {
              "name": "commons-io:commons-io",
              "version": "2.1"
            }
          ]
        }
      ]
    },
    {
      "packageUpdates": [
        {
          "name": "commons-beanutils:commons-beanutils",
          "versionFrom": "1.7.0",
          "versionTo": "1.9.4",
          "transitive": true
        }
      ],
      "fixed": [
        {
          "id": "GHSA-6phf-73q6-gh87",
          "packages": [
            {
              "name": "commons-beanutils:commons-beanutils",
              "version": "1.7.0"
            }
          ]
        }
      ]
    },
    {
      "packageUpdates": [
        {
          "name": "commons-net:commons-net",
          "versionFrom": "1.4.1",
          "versionTo": "3.9.0",
          "transitive": false
        }
      ],
      "fixed": [
        {
          "id": "GHSA-cgp8-4m63-fhh5",
          "packages": [
            {
              "name": "commons-net:commons-net",
              "version": "1.4.1"
            }
          ]
        }
      ]
    }
  ]
}
Scripted usage
The non-interactive mode, in combination with other flags, can be used in scripts to automatically apply and test remediation patches.
Check out our sample Python script that uses osv-scanner fix to remediate as many vulnerabilities as possible in an npm project without failing your project’s npm run test.
Interactive mode
Interactive mode provides a step-by-step process to understand and fix vulnerabilities in your project.
Interactive mode currently only supports npm manifest and lockfiles.
To run it, you can use the following command:
osv-scanner fix --interactive -M path/to/package.json -L path/to/package-lock.json
The subcommand will modify your manifest and lockfile. Make sure you commit or backup your files before running.
The command will launch the Guided Remediation TUI and begin scanning your manifest and lockfile for vulnerabilities. Use the arrow keys to navigate menu items and the ENTER key to select. TAB can be used to switch to and from the information panel of each option.
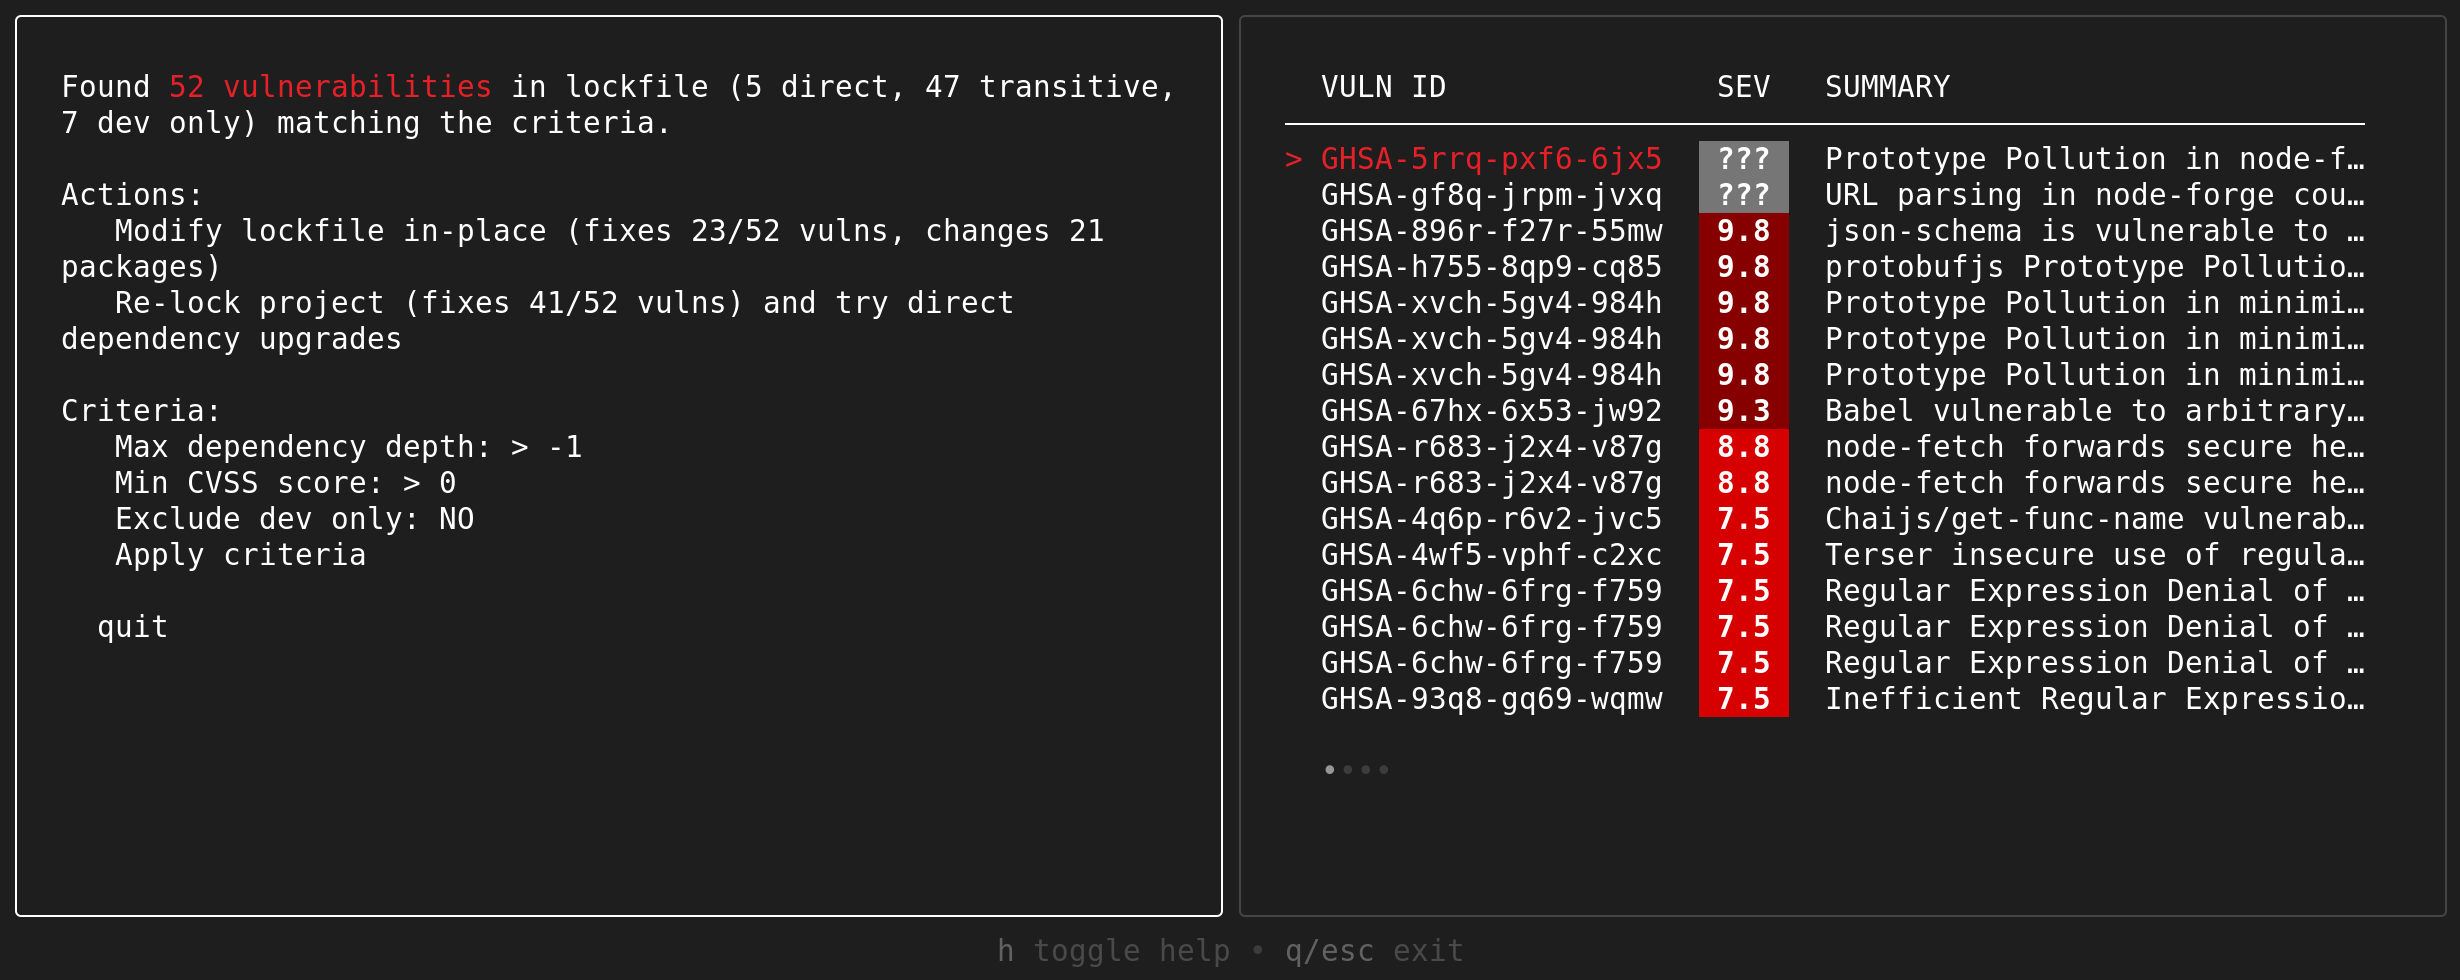
The initial screen allows you to change the vulnerability selection criteria. Each correspond to a vulnerability selection flag:
- Max dependency depth:
--max-depth- Min CVSS score:
--min-severity- Exclude dev only:
--ignore-dev
From the first results screen, you can select which of the two remediation strategies to attempt.
Remediation strategies
There are currently three remediation strategies:
In-place lockfile changes
‘In-place’ remediation involves replacing vulnerable versions of packages in your lockfile with non-vulnerable versions, while still respecting the existing constraints for that dependency. This approach is usually less risky, but will often fix less vulnerabilities than the relax strategy.
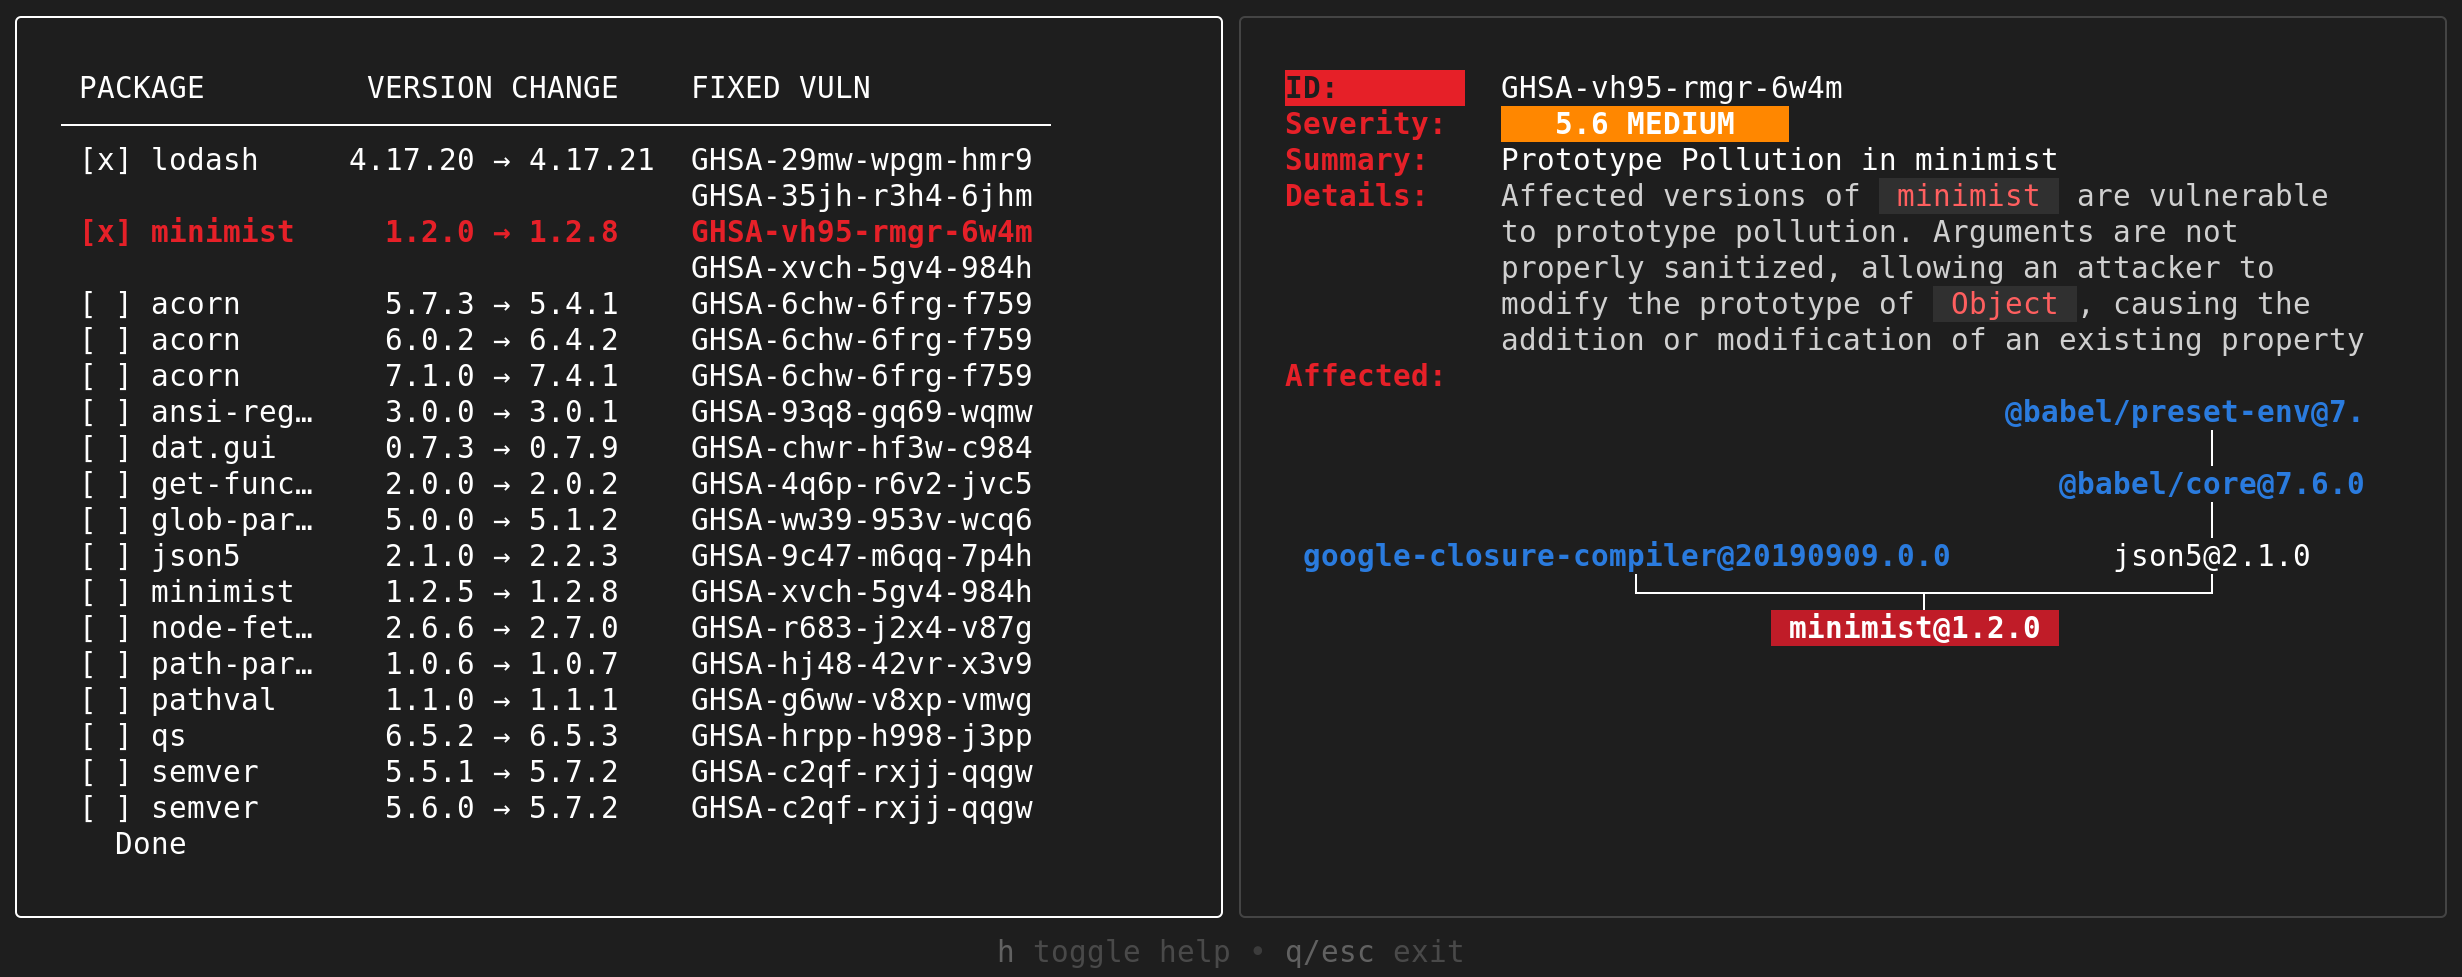
Selecting the “Modify lockfile in place” option will bring you to the in-place information page. From here, you can see which vulnerabilities can and cannot be resolved by this strategy. By default, every possible in-place patch will be chosen to be applied. You may instead choose which subset of patches you wish to apply.
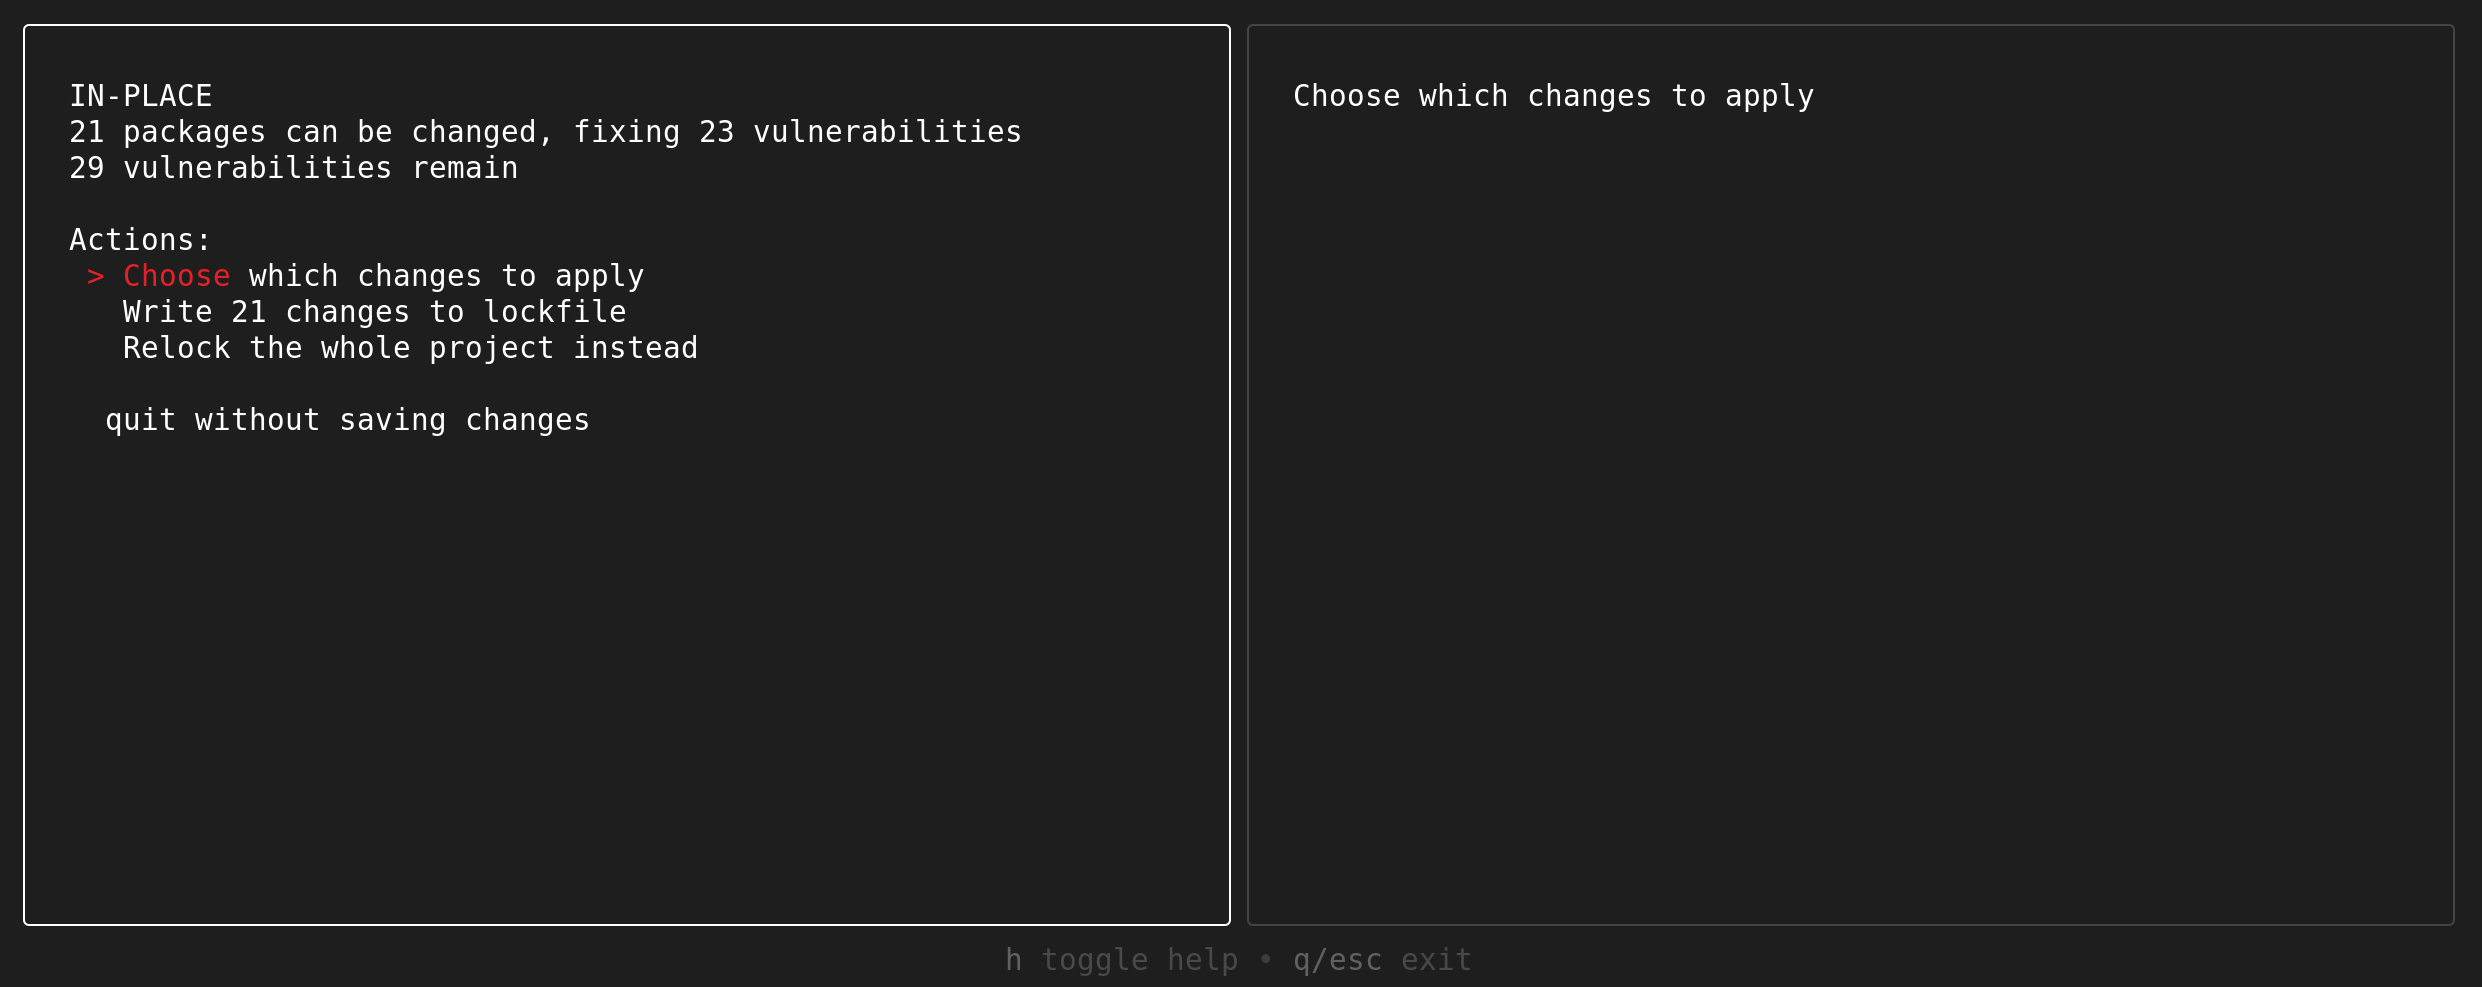
If you wish to apply the proposed in-place patches, select the “Write” option to update your lockfile with the new dependency versions.
Writing these changes will not reinstall your dependencies. You’ll need to run npm ci (or equivalent) separately.
Relock and relax direct dependencies
Relocking recomputes your entire dependency graph based on your manifest file, taking the newest possible versions of all your required packages. Doing so will often allow for constraints on vulnerable packages to be unblocked and thus able to be remediated. However, relocking may cause a large number of changes to your dependency graph, which potentially carries a larger risk of breakages.
Selecting the “Relock” option will bring you to the relock information page. Here, you can see which vulnerabilities are present after relocking.
In addition to relocking, it may be possible to further remove vulnerabilities by bumping the required version constraints of your direct dependencies. You may choose to apply these patches by selecting them on the relock page then choosing the “Apply pending patches” option. The dependency graph will then be recomputed, and you may continue to select more options.
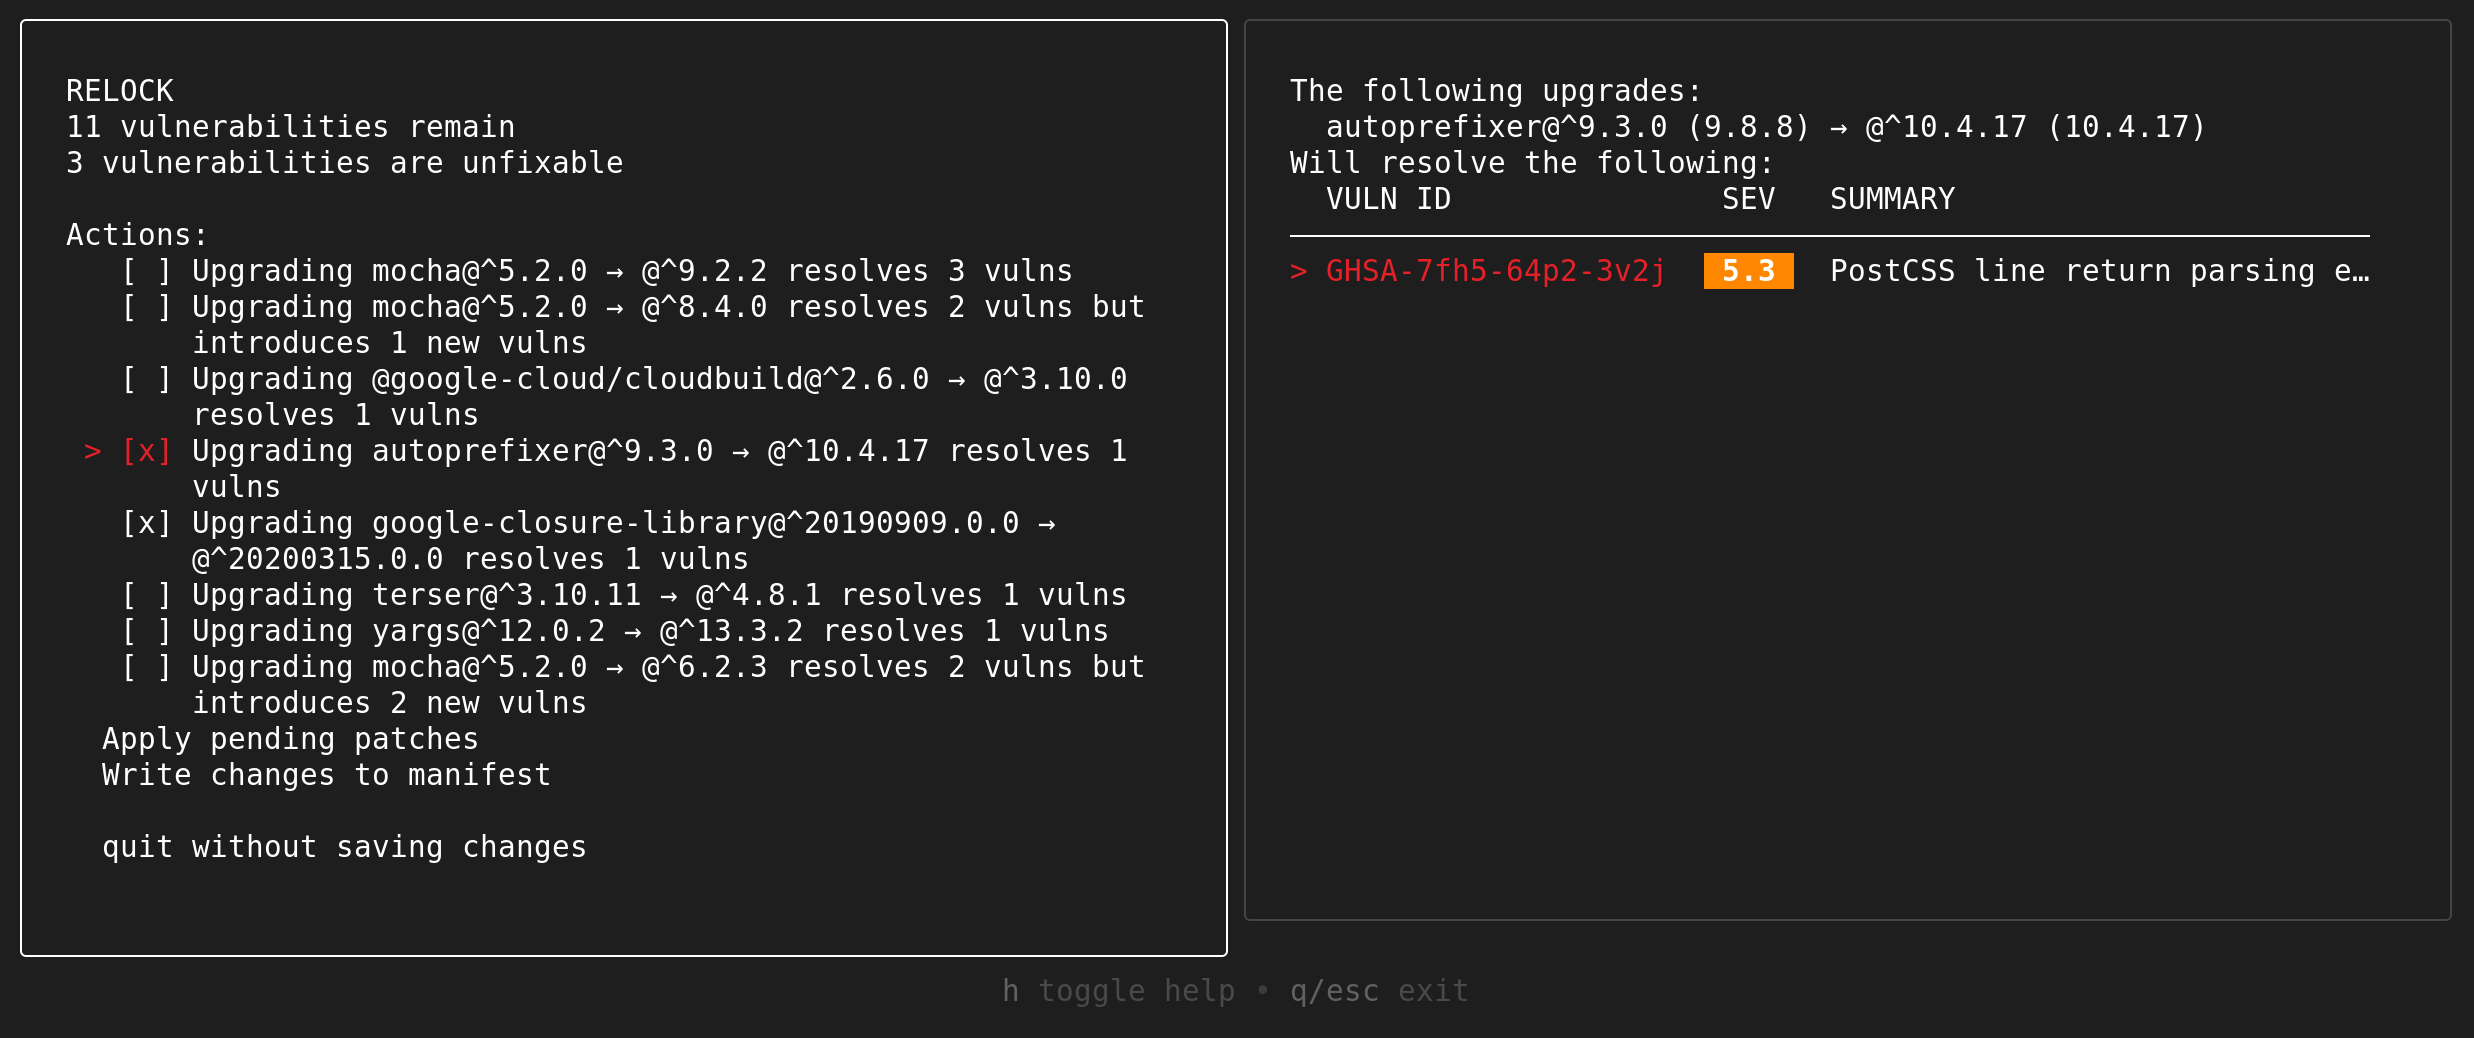
The relaxation patches are presented in order of effectiveness, with patches that resolve the most vulnerabilities with the least amount of dependency change shown first.
If you wish to apply your current relock & relaxation changes, select the “Write” option to update your manifest file with the new requirements and regenerate your lockfile (if provided).
The package-lock.json file is regenerated by first deleting the existing package-lock.json and node_modules/ directory, then running npm install --package-lock-only. This recreates the lockfile but does not install the node_modules/ dependencies. Run npm ci separately to install the dependencies.
Override dependency versions
The override strategy is currently only supported in non-interactive mode.
Maven allows for the version specification of direct and indirect dependencies to be overwritten by a POM’s <dependencyManagement>. This mechanism can be used to force a vulnerable dependency to be updated to a newer, non-vulnerable version. Overriding dependency versions can enable otherwise inaccessible updates, but it also risks breaking the application if the new version is incompatible with other dependencies.
If a direct dependency is vulnerable, the override strategy will update its version in the <dependencies> section (if possible). Relevant <properties> will be updated if used by an existing version specification.
As with the other strategies, override patches are prioritized by vulnerabilities fixed per updated dependency.
Remediation flags
The fix subcommand has a number of flags to allow you to control which vulnerabilities and patches may be considered during remediation.
Guided remediation can be run in the interactive mode with --interactive flag.
Non-interactive flags
The following flags may be used when running in non-interactive mode only:
--strategy=in-placeORrelaxORoverride: Which remediation strategy to use.-
--apply-top=<value>: Specifies the maximum number of patches to apply. Patches are chosen in the same order as they would appear in the interactive mode.For example,
--apply-top=1will only apply one patch, and--apply-top=2would apply the two best compatible patches. This flag is particularly useful when scripting to test the outcome of specific patches. Setting--apply-top=-1will apply every possible patch (default behavior). --no-introduce: Set to exclude patches that would introduce new vulnerabilities if applied.--format=textORjson. The output format to use for results.
Vulnerability selection
The following flags may be used to filter which vulnerabilities will be selected for remediation:
-
--max-depth=<value>: The maximum dependency depth to consider vulnerabilities from.For example,
--max-depth=1will only consider vulnerabilities affecting direct dependencies, while--max-depth=2will consider up to the direct dependencies of your direct dependencies. Setting--max-depth=-1will consider all dependencies, regardless of depth. -
--min-severity=<value>: The minimum CVSS score of vulnerabilities to consider.For example,
--min-severity=7.5will consider only vulnerabilities with CVSS a score of 7.5 and above. If the OSV record for the vulnerability does not have a CVSS score, it will not be excluded. --ignore-dev: Whether to exclude vulnerabilities from dependencies that are only used indevDependencies.--ignore-vulns=<comma-separated list of IDs>: A list of OSV IDs to exclude from consideration.--vulns=<comma-separated list of IDs>: An explicit list of OSV IDs that should exclusively be considered, as long as the other criteria are satisfied.
A vulnerability is only considered if it satisfies all the conditions set by these flags.
Dependency upgrade options
The following flag may be used to limit the patches allowed for your dependencies:
-
--upgrade-config=<[package-name:]level>Sets the maximum upgrade level allowed for a package. Can be repeated for multiple packages.levelis the SemVer component to allow updates to, can be one ofmajor,minor,patch, ornone. e.g. If a package was at version1.2.3majorallows for updates to any version>=1.2.3minorallows for updates>=1.2.3, <2.0.0patchallows for updates>=1.2.3, <1.3.0nonedisallows any updates
If
package-name:is omitted,levelis applied to all packages. The specificpackage-name:levelwill take precedence over the generallevel(e.g. specifying bothminorpkg:nonewill usenoneas the allowed level forpkg).Default behaviour is
--upgrade-config=major.Example usage:
--upgrade-config=minor- disallow any patches that would bump a major version of any package.--upgrade-config=foo:minor- disallow any patches that bumps packagefooby a major version. Other packages may receive major version-updating patches.--upgrade-config=none --upgrade-config=foo:patch- only allow patches to packagefoo, and only allow changes tofoo’s SemVer patch level.
Data source
By default, we use the deps.dev API to find version and dependency information of packages during remediation.
If instead you’d like to use your ecosystem’s native registry API (e.g. https://registry.npmjs.org), you can use the --data-source=native flag. osv-scanner fix will attempt to use the authentication specified by the native tooling (e.g. npm config or Maven’s settings.xml)
If your project uses mirrored or private registries, you will need to use --data-source=native
The subcommand caches the requests it makes in
[FILE].resolve.deps(deps.dev),package.json.resolve.npm(native npm), orpom.xml.resolve.maven(native Maven).The native caches will store the addresses of private registries used, though not any authentication information.
Maven flags
--maven-fix-management: If set, patches for vulnerabilities in packages declared in<dependencyManagement>will be made, even if those packages are not found in the resolved dependency tree (useful for patching parent POM files).--maven-registry=<URL>: Override for the default registry used to fetch dependencies (typically thecentralrepository athttps://repo.maven.apache.org/maven2)
Offline Vulnerability Database
The fix subcommand supports the --offline-vulnerabilities and --download-offline-databases flags.
For more information, see Offline Mode.
Known issues
- The subcommand does not use the
osv-scanner.tomlconfiguration. Use the--ignore-vulnsflag instead. - The subcommand does not group aliases of the same vulnerabilities together.
-
Unique vulnerabilities are counted differently with
fix --strategy=relaxversus withfix --strategy=in-placeand withscan.scanwill count the same OSV ID affecting two different package versions separately, whereasfix --strategy=relaxwill count this as one vulnerability.e.g. if
OSV-123-456affects bothfoo@1.0.0andfoo@2.0.0in your project,scanandfix --strategy=in-placewill treat this as two distinct vulnerabilities, whilefix --strategy=relaxwill treat this as only one.
npm
- Non-registry dependencies (local paths, URLs, Git, etc.) are not evaluated.
- #1026
peerDependenciesare not properly considered during dependency resolution (treated as if using--legacy-peer-deps). overridesare ignored during dependency resolution.
Workspaces
Remediation in npm workspaces is only partially supported:
- In-place updates should function correctly on the workspace
package-lock.json. - Dependency relaxation can change dependencies in the
package.jsonfile being scanned. This means only dependencies declared in the root package can be changed.- You can remediate the individual
package.jsonfiles of each workspace, but this will be unaware of any packages or constraints caused by sibling workspaces.
- You can remediate the individual
- The
node_modules/in workspaces are not deleted when relocking, which may impact the resulting dependency graph when runningnpm install. - Each workspace package is considered dependency depth 1 from the root workspace.